Struggling with dry winter skin? Fear not! You can easily make a homemade moisturizer for dry skin in winter at home!
Commercial creams for the face can do more harm than damage in the long run, especially because they’re often loaded with harmful chemicals, alcohols, and unnecessary fillers. But it doesn’t have to be this way!
Click for a creamy, decadent, and moisturizing DIY winter face cream recipe and soothe it naturally!
We’re beginning with a new series today, Winter Plum. The reason for it is because I got a gorgeous plum kernel oil a while back and wanted to use it as effectively as I could!
Today it’s time for some facial care! We’re making a lovely cream for dry skin in winter. It packs some hydrating and nourishing ingredients that my skin absolutely adores and I dearly hope yours will as well!
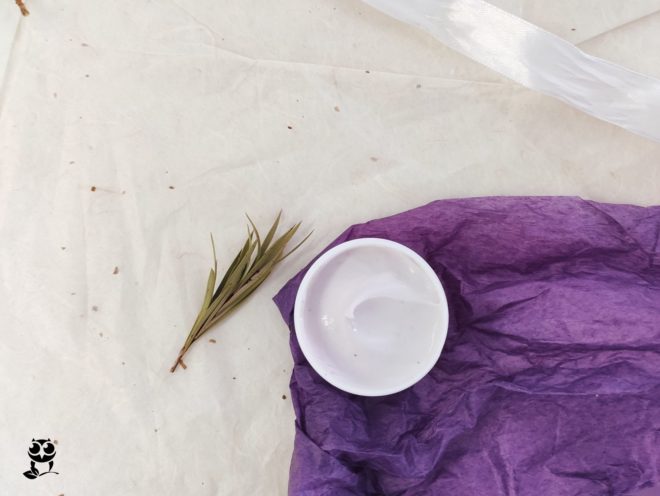
This is a rich, thicker, and creamy facial cream, perfect for cold winter months! It has a plum oil almond scent, and it works lovely with the purple mica.
It’ll leave your skin soft, moisturized, and plump; it took a long while to convince myself that it’s okay to give it away (and gave me an excuse to just make more!).
Let’s have a look at where the deeply hydrating and moisturizing effects of this cream come from before we head over to the recipe!
Want to master lotion & cream making? Learn how to formulate lotions independently from scratch with my detailed guide to lotion making. Beginner-friendly, super detailed, with 3 different formulations and 2 variations. Bonus! Formulation worksheet.
Ingredients for a winter homemade moisturizer
Olive squalene is obtained from olive oil. It’s a powerful moisturizer that can penetrate the skin more quickly than olive oil, and it contains all of its beneficial properties. It softens the skin, boosts its elasticity, and improves its texture. What’s more, it has potent regenerating properties and it’s excellent in skincare that targets anti-aging and dry skin.
Plum kernel oil is the silver lining of our Winter Plum recipe series this year. It’s a lightweight oil that makes the skin soft and smooth. It has a characteristic scent of marzipan; I’m not a fan of that because I just can’t stomach anything marzipan-related, but I can agree that (apart from the scent, which my nose hates), the oil works beautifully for the skin!
Cupuacu butter is a soft butter, similar to mango butter. It’s a lovely ingredient that works excellently in a number of DIY skincare recipes (I’ve based last-year holiday recipe series on it). It’s a vegetable alternative to lanolin as it helps to hold a large amount of water. Cupuacu forms a protective layer on the skin, helping it prevent further water loss. It makes the skin smooth, soft, and glowing!
Vitamin E oil adds a touch of moisture; it’s not a necessary ingredient but a welcome one. Since we’re already using it as an ingredient in the series, I figured it would be nice to add it to the formulation!
The usual ingredients that are a must in any emulsion we make at home are:
- An emulsifier, which in my case is Olivem1000; this one binds water and oil together
- A preservative; I use Cosgard. Making an emulsion without it would mean it would quickly become a breeding ground for mold and bacteria
- Distilled water: a base of most emulsions
- Cetyl alcohol (optional but very welcome): keeps the skin moisturized, improves the slip, and helps to turn emulsions into creamy concoctions. Trust me, you want to give it a try!
How to make winter face cream at home?
Here’s the thing: if you’ve made emulsions before, this recipe is easy. If you haven’t, feel free to give it a go, but I suggest you read my post on how to make lotion before you get started with this recipe.
First, we weigh water-phase ingredients in one beaker. Then, weigh the beaker with water phase (and write down the number, you’ll need it later to substitute the evaporated water once all the ingredients melt).
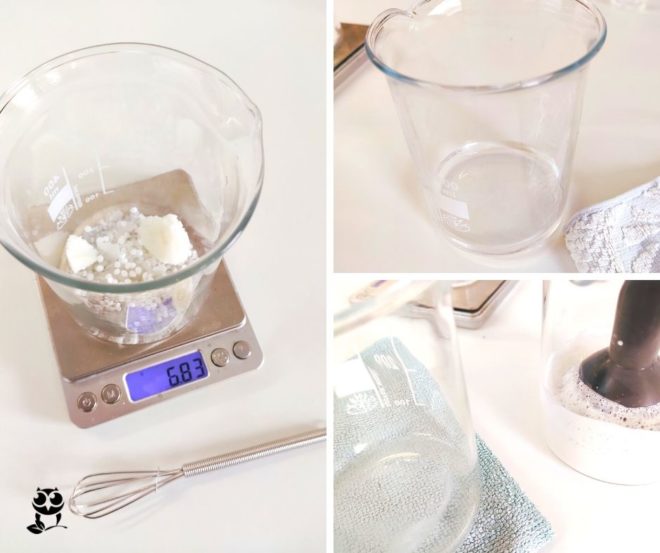
Next, we weigh the oil-based ingredients in the other beaker. We pop both beakers into a water bath and wait until all ingredients are thoroughly melted (20-30 minutes).
Next, we top up the evaporated water from the water phase with distilled water. Then, we pour the water base into the oil phase and begin mixing for a couple of minutes.
Leave the emulsion to cool down before adding the last few ingredients from the cool-down phase.
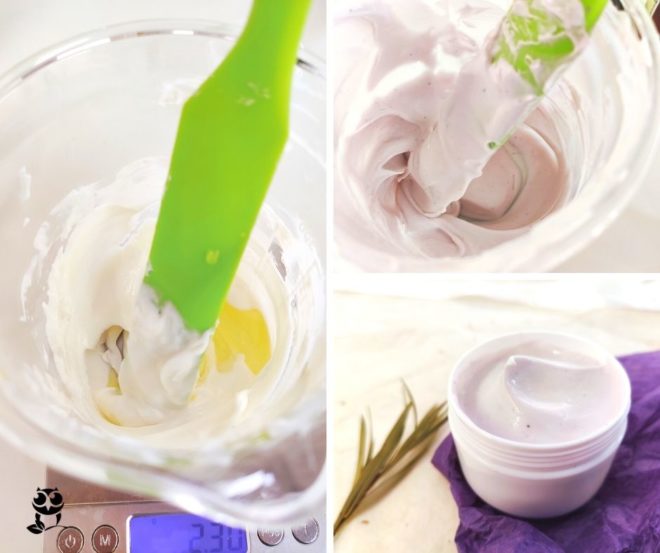
After that, stir well and your homemade winter cream for dry skin is done! Pour it into a 50g clean container and it’s ready to use!
Winter Plum Facial Cream Recipe
Water-phase:
- 66.2g distilled water
- 4g vegetable glycerin
Oil-phase:
- 5g Olivem1000
- 8g Cupuacu butter
- 5g Plum kernel oil
- 2g Cetyl alcohol
Cool-down phase:
- 0.5g Cosgard
- 6g olive squalane
- 0.2g ylang-ylang essential oil
- 0.1g purple mica powder
- 2g vitamin E oil
Process:
- Prepare a water bath: add 3cm/1” of water to a wide pan. Bring the water to simmer (low-medium heat).
- Weigh water phase ingredients in a heat-resistant glass measuring cup and note the weight of the beaker with the ingredients inside
- Weigh the oil ingredients in a second heat-resistant glass measuring cup
- Place both beakers in a pan to melt all the ingredients (about 15-20 minutes)
- Next, take both beakers from the water (all ingredients should be melted and dissolved fully by this point).
- Weigh the water phase again and top up with distilled water to reach the original weight you noted down at the beginning
- Pour the water phase into the oil phase. Take your immersion blender and begin blending the lotion. Blend for about 5 minutes and leave the lotion to cool down. You’ll want it to be below 104F/40C degrees before you continue with the last, cool down, phase. The emulsion has to be below 40C or the heat can damage the final few ingredients.
- Once your DIY winter cream has reached the desired temperature, add cool-down phase ingredients: squalane, mica powder, vitamin E oil, and essential oil; stir well.
- Add cosgard as the final ingredient. Stir with a spatula well for a minute or two, until it’s evenly incorporated into the lotion.
- Transfer the body cream to a clean (sterilized) container.
- Pack it and apply as needed!
Notes:
- You can substitute cupuacu with mango butter
- Use mica of your choice or omit it altogether
- You can use different essential oil or omit it completely
Have you made this DIY winter face cream? Tag me on Instagram: #wildfordiy!
Help support Wild for Nature
Many of you have asked if there’s a way to help support Wild for Nature. I’ve signed up for Buy Me Coffee. If you love what I do, learn from me, sell anything you made from my recipes, and want to see Wild for Nature grow even more, I’d be thrilled if you’d consider buying me a coffee! It works as a one-time or a monthly donation of $3. You can also get beautifully designed PDFs with a series of recipes and other resources I publish there, to help you learn and get creative at home! I can then use that money to further develop and grow Wild for Nature and you can help me continue with wild creations and resources!
This sounds wonderful. Due to physical limitations it’s not possible for me. Do u sell this product?
Thank You,
Lynnita
Thank you Lynnita. At the moment not, but I’m in the process of starting my skincare business. Keep an eye out for my Etsy shop 😀